Supreme Commander Exporter for Blender3D (www.blender3d.org)
Written by dan (www.sup-com.net), Brent (www.scmods.net)
Further improvements by GeomanNL and me lately.
The V3.5 Version.
[Download]
And the old version for compatibly reasons.
How to get started:
The first thing you should do, is to import some orginal Units and take a closer look to Bones, Vertexgroups...
Make sure you have the latest export/import Script in directory Blender\.blender\scripts.
Vista users may take a look at this post.
Blender won't show models right after importing, but it is there. This is a bug in the Import script.
Select the model in Outliner and click on the armature or switch to editmode(Tab) and leave it to make it appear.
Notice: importing of animations may does still not work for some units!
You may take a look at those tutorials:
- How to export a model
- UV mapping a Blender model for Supreme Commander (by Pureon)
Also you should have found those not blender specific links. Where you find almost all useful stuff on this forum. For example if you want to know where to find the model files take a look at this.
- Mod Developer Support/ Useful Information -- Please Read Before Posting! (by angrycola)
- Modeling, Texturing, & Animation/Useful Information (by OrangeKnight)
Some further beginner hints:
- Create Mesh:
While creating your moddel you often also create double faces. This causes problems while texturing so use "Remove Doubles" to solve this.
Unfortunately this doesn't help in every case. So you sometimes have to delete Faces and redo them. But unfortunately you recognize those problems mostly just after texturing. (To prevent that export before texturing and look for shadow problems in SupCom which are often indicator for overlapping Faces) - Include Bones:
You need at least one bone, named like your unit (in SupComUnitcode).
If you import an original model you see bones aren't bones as usual. In SupCom bones are really more Points than Bones, so the only thing which matters is the position and the direction of the z-Axis.
To rotate your Bones to the SupCom orientation select your Bone and press Ctr + R, then turn the bone z axis to front. (Draw Boneaxis) - Mesh and Armature
You have to parent your Mesh and Armatures.
Select your Mesh(Object), and the Armature in Object mode and Parent them with ctl+p.
If you parented it right Blender asks whether it should create Vertex Groups named like the bones you have.
What you chose depends whether you already created Vertex Groups.
Every part which will be moved from your bones has to have its own Vertex Group named like the bone which will move it.
So you have at least one Vertexgroup including your Mesh named like the Main-Bone.
To include vertices into vertex groups, you have to do the following:
you select the vertices/faces,
you create a new vertex group (In Editing (F9) -> "Links and Materials" Panel, button: "new"),
give the vertex group the same name as controlling bone,
assign the vertices to vertex group (button: "assign"), - Texturing:
Create your UV-map (search for blender tutorial if you don't know how or take a look at Pureons tutorial), save it as .tga (Blender: UVs/Save UV Face Layout../). Open .tga with Photoshop and save your edited .tga pic as_Albedo.dds
If your Mesh looks transparent in "UV-Face Select" Mode you probably have your Normals shown in different directions. They all have to point in the same direction to outside or to the inside of the model.
(Inside isn't usually right in my opinion but I faced a case where only the inside worked.) - Outliner:
The Outliner is very useful. You can get a clear view of parentings and easily rename ( Ctr + left click ) things.
Sorry if I miss something or even post something wrong. Please post.|||Supcom uses Y up, Z to point, X doesn't matter.
In Supcom, bones are really more points. So use the bones not as 'bones' but as points, where supcom draws the connection to the base point of the parent.|||thx, i have read your other post(s). But i dont understand how it should work. One problem is, bones are not rotateable exept in pose mod. So it moves the whole part it belongs to.
Could somone (dan) work further on the export script for blender, turning Bones automaticly.
Edit.: I m realy frustrated... I m trying to get my model (correct) imported since days. Please help.|||Sorry for your frustrations Darius,
The blender scrips were never completed. I never got SC working on my computer so I never got around completing them. Brent Allen did some bug fixes but I think he moved on to other things cause I haven't heard from him in a while.
I hope you manage getting your units working anyway.|||I've only recently started exporting things from Blender into SupCom and it's not easy. But Dan thanks for the work you've done on it, especially since you don't have the game to test it out on!|||Unfortunately it was my fault
It seams to work fine, however it costs far more time than i thought to get a model ingame. :)
About Bone Problem: Unparent them turn your mesh with front in direction of bone axis(z) move your Bones to correct places, parent mesh and bones, rotate your model (front in world-direction z). In edit mode not pose!
Coordinates: the model has to look in world z direction while y give height (y=0 ground) Just import a original model and look how it should look
Textures: create your uv-map (search for tutorial if you don't know how), save it as .tga (Blender: UVs/Save UV Face Layout../)
Open .tga with Photoshop and save your edited .tga pic as

PS.: Dan and Brent you done nicely. I realy thank you for your good work.|||Whenever I change the parent of ANYTHING, the object that I changed randomly appears elsewhere in the workspace. Could you tell me more about the bones. I am having the same problem. Except it keeps saying in the log.txt that it cannot find bones which I know I put in.
Thanks.|||This is my first blender project so I'm not that pro. But i will give you a checklist:
+ As I can now say make sure you have the latest script 0.3.0.0.(Blender\.blender\scripts)
+ Also make shure your model looks the same in pose and edit mode.
+ Ever looked how your unit looks in SC? (Enable cheats, pres Alt +v and Alt + b)
All the time I unparent a mesh it goes to position(rotation) it has before I parented it(Or something like this). This maybe is what you mean with randomly in workspace.
You have your armature(ARM_
Left side is original SC model(ignore .001 which blender added automatically), right side my model (in a earlier status) (You get this by select "Window type"(bottom left) to Outliner)
http://insidesupcom.de/attachment.php?a ... 1186428830
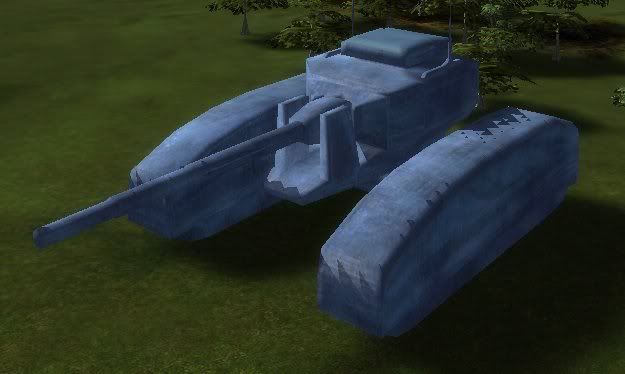
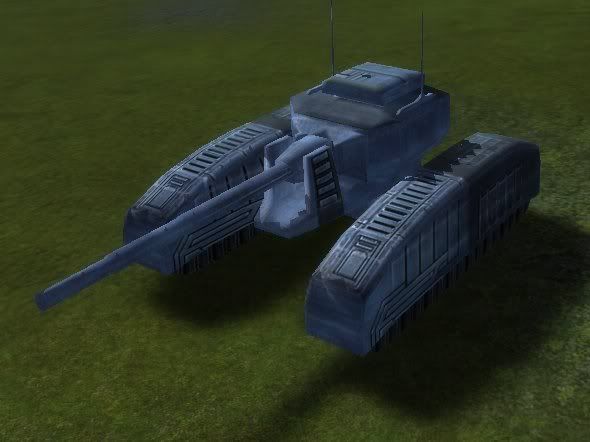
I hope this helped a bit.|||I've been working on a few models including a 'Sniper' anti-tank one, but it's giving me some weird shadows and parts of the 3d model are missing in-game. Here's a screenshot of the 3d model with generic beta textures:

The shadows are square (the previous models I added to the game had smooth shadows), and the turret looks like it's floating because the base is half invisible.
This (unfinished texture and I still need to work a bit on the script, the aft guns don't quite work right) unit was made in blender:
http://forums.gaspowered.com/viewtopic.php?p=203251
The orientation isn't the same as blender's views, and the bones are confusing until you figure them out.
Speaking of... Is there a hard limit in the Supcom engine for bones?|||you did this with blender? well all my models had strange shadows and graphic glitches, dunno why, maybe its something with the exporter...
check up the face-normals if those are correct, this could be a reason for the transparency|||Thanks guys that's actually a lot of help. I remembered the turret base isn't attached to the turret by vertices even though they are in the same vertex group. So yes Deathstalker it's probably the unmerged meshes, if that's what you meant.
The tank itself works perfect, turret rotates, muzzle fires etc. I'm more a UV Mapper/texturer than a 3D modeler, so we'll see how this one looks when I put some real textures on it. Maybe they'll cover up the square shadows
edit: Merging worked-
edit2:
Well after adding some initial textures I finally saw that this game just isn't compatible with blender yet. The textures were completely messed up, certain parts of texture weren't showing, others moved around when the tank moved, and some appeared in places they weren't supposed to appear. EDIT - It was my fault, messy faces and rotating tank track texture in wrong postion. Blender works with this game...|||About the shadow problem, this is may because you have overlapping faces.
You may try "Remove Doubles".
It seams to work fine for your turret. I think the exporter works, except some minor problems. At least I cant see any moving texturs or things like that on my model.
If you have such a "transparency" problem based on Normals, you can even notice this before setting your uv-map: If you are in "UV-Face-Select" mode and it is transparency there, it is "transparency" in game. (They all have to point in the same direction(inside model, or to outside))
I also had a problem with transparency even though my Normals where all showing to outside. I inverted all Normals to inside and it worked fine. I don't understand why I had a model where normals to outside where correct and one where the opposite is correct but it works now so I don't mind.|||It seems to have worked, I simplified shapes and removed then replaced parts that were buggy and it all appears to work perfect. Now I only need to find out how to get the tank to turn and fire at the enemy rather than just sit there with it's back turned! Anyway thanks all for your help
btw Darius, could you post a screenshot of your model, all I see is a German language login page on the links above? I'm sure it's the same for others on this forum.|||Back turned? Sounds like you have your bones incorrect. Keep in mind that bones have to point to world axis z. The muzzle bone axis z is used for targeting.^
Pureon: Thanks for your hint, I totally forgot you have to sign in to see images uploaded to InsideSupcom.|||wrong! not the muzzle bone z axis is used for targetting, but the barrel vones z axis and the one of the yaw bone|||Yes you are right, at least this makes a lot more sense
Anyway I took a closer look at the tank when it moved and noticed that now parts of the underside have moving textures, so my problems weren't at all solved, just moved to a different area. I'm going to work on a new base and turret, but maybe I'll just scrap this model completely and think of a much simpler design.
Darius that's a cool model, do the walking animations work?|||The walking and death animations worked fine. But I made them as the bones of my model hasn't had the "supcom orientation" so it looks quiet funny now as you could mind.
But this works. I have also made a animation for an other model recently.|||I realised that all the texture problems I've been having were confined to the bottom 15% of the UV texture. So I edited the UV layout in Blender and moved all of the most important parts to the top:

It worked! All my texture problems were solved. I've got the latest versions of both Blender and Python, so don't know what's happening. Hope this helps anyone with similar issues
As you may seen its written by dan -( www.sup-com.net), Brent ( www.scmods.net).
Dan wrote the 4th post in this Topic so you could pm them. But I don't know how often he is visiting this forum because he unfortunately "never got SC working" on his computer.|||Oh... funny, might've been wasting my time then :)
But I'll try to PM him anyway, thanks.
No comments:
Post a Comment